
' d='M0 0h21v15H0z'/%3E%3Cpath fill='url(%23b)' d='M-.002 0h21v15h-21z'/%3E%3Cpath d='M5.003 10H-.002V5h5.005L-2.082.22l1.118-1.657 8.962 6.045V-1h5v5.608l8.962-6.045L23.078.22 15.993 5h5.005v5h-5.005l7.085 4.78-1.118 1.657-8.962-6.045V16h-5v-5.608l-8.962 6.045-1.118-1.658L5.003 10z' fill='url(%23a)'/%3E%3Cpath d='M14.136 4.958l9.5-6.25a.25.25 0 00-.275-.417l-9.5 6.25a.25.25 0 10.275.417zm.732 5.522l8.515 5.74a.25.25 0 10.28-.415l-8.516-5.74a.25.25 0 00-.279.415zM6.142 4.526L-2.74-1.461a.25.25 0 00-.28.415L5.863 4.94a.25.25 0 00.279-.414zm.685 5.469l-9.845 6.53a.25.25 0 10.276.416l9.846-6.529a.25.25 0 00-.277-.417z' fill='%23DB1F35' fill-rule='nonzero'/%3E%3Cpath fill='url(%23c)' d='M-.002 9h9v6h3V9h9V6h-9V0h-3v6h-9z'/%3E%3C/g%3E%3C/svg%3E)
' d='M0 0h21v15H0z'/%3E%3Cpath fill='url(%23b)' d='M0 0h21v4H0zm0 11h21v4H0z'/%3E%3Cpath fill='url(%23c)' d='M0 4h21v7H0z'/%3E%3Cpath fill='%23FFEDB1' d='M5.5 7h1v.5h-1z'/%3E%3Cpath d='M4.915 8.46c.025.295.291.54.585.54s.56-.246.585-.54L6.207 7H4.793l.122 1.46zm-.624-1.465a.456.456 0 01.465-.495h1.488a.45.45 0 01.465.495l-.126 1.506A1.104 1.104 0 015.5 9.5a1.104 1.104 0 01-1.083-.999L4.29 6.995z' fill='%23A41517' fill-rule='nonzero'/%3E%3Cpath fill='%23A41517' d='M4.5 7.5h2V8H6l-.5 1L5 8h-.5zM3 6h1v3.5H3zm4 0h1v3.5H7zm-2.5-.5c0-.276.214-.5.505-.5h.99c.279 0 .505.232.505.5v.248A.248.248 0 016.255 6h-1.51a.245.245 0 01-.245-.252V5.5z'/%3E%3C/g%3E%3C/svg%3E)

Did you know that choosing the wrong 3D printing technology can double your costs or ruin your expectations?
3D printing technologies, FDM, SLA, and SLS, each have their own advantages, limitations, and rules. If you don’t consider them during design, mistakes can’t be fixed in manufacturing.
In this practical guide, you’ll learn how to:
-
Compare the main 3D printing technologies.
-
Identify the most suitable one based on your part, application, and budget.
-
Avoid costly design errors from the very beginning.
Why is choosing the right 3D printing technology so important?
Selecting the right 3D printing technology directly impacts your project’s success. It affects:
-
Total cost per part or batch.
-
Lead time.
-
Technical feasibility of the design.
-
The number of iterations required.
Aligning geometry with the process is critical: material, orientation, and the need for supports directly influence strength and finish quality. That’s why it’s always best to validate the technology before finalizing the design. For example:
- Using SLA for a mechanical part can cause breakage due to brittleness if the right resin isn’t selected.
- Using FDM for complex geometries limits detail and results in uneven surfaces.
How do the main 3D printing technologies differ?
While there are many processes, professional production primarily uses:
FDM 3D Printing
Fused Deposition Modeling (FDM), also known as Fused Filament Fabrication (FFF), is an additive manufacturing process that builds three-dimensional parts by extruding melted thermoplastic through a controlled nozzle.
It is the most widely used 3D printing technology among home users, classrooms, and maker spaces.
Advanced Design Tips
-
Cross-orientation: Rotate layers 90° relative to the main load to increase Z-strength by +35%.
-
Gyroid infill: Reduces weight without losing rigidity; 15% infill.
-
Hidden seam: Place the seam along inner edges → cleaner exterior finish.

Post-Processing & Optimization
- Acetone vapor (ABS): Seals surfaces for hydraulic parts.
- Heat-set threaded inserts: M3–M8 without cracking walls if ≥1.2 mm.
- Dual-coat painting: Apply after epoxy primer for visual applications.
SLA 3D Printing
Stereolithography (SLA) uses the photopolymerization of liquid resins, cured layer by layer with a light source.
SLA parts stand out for their high resolution, excellent dimensional accuracy, and smooth surface finishes. This makes them perfect for professional-looking prototypes, similar in appearance and texture to injection-molded parts.
Advanced Design Tips
-
20° peel angle: Reduces interior support marks.
-
Microchannels ≥ 400 µm: Ensures flow after resin drainage.
-
Internal lattice structures: Lightweight masters for molding.
Key Materials
- Standard Resin: Best for visual prototypes and detailed parts.
- ABS-like Resin: Suitable for functional prototypes requiring rigidity.
- Nylon-like Resin: Greater impact resistance and slight flexibility; ideal for parts under repeated stress.
Post-Processing & Optimization
-
UV curing: 30 min / 60 °C to reach final properties.
-
PU coating: For sealing and chemical resistance.
-
Manual polishing (grit 1000 → 3000): For transparent lenses and visors.

Choose wisely to avoid surprises and extra costs.
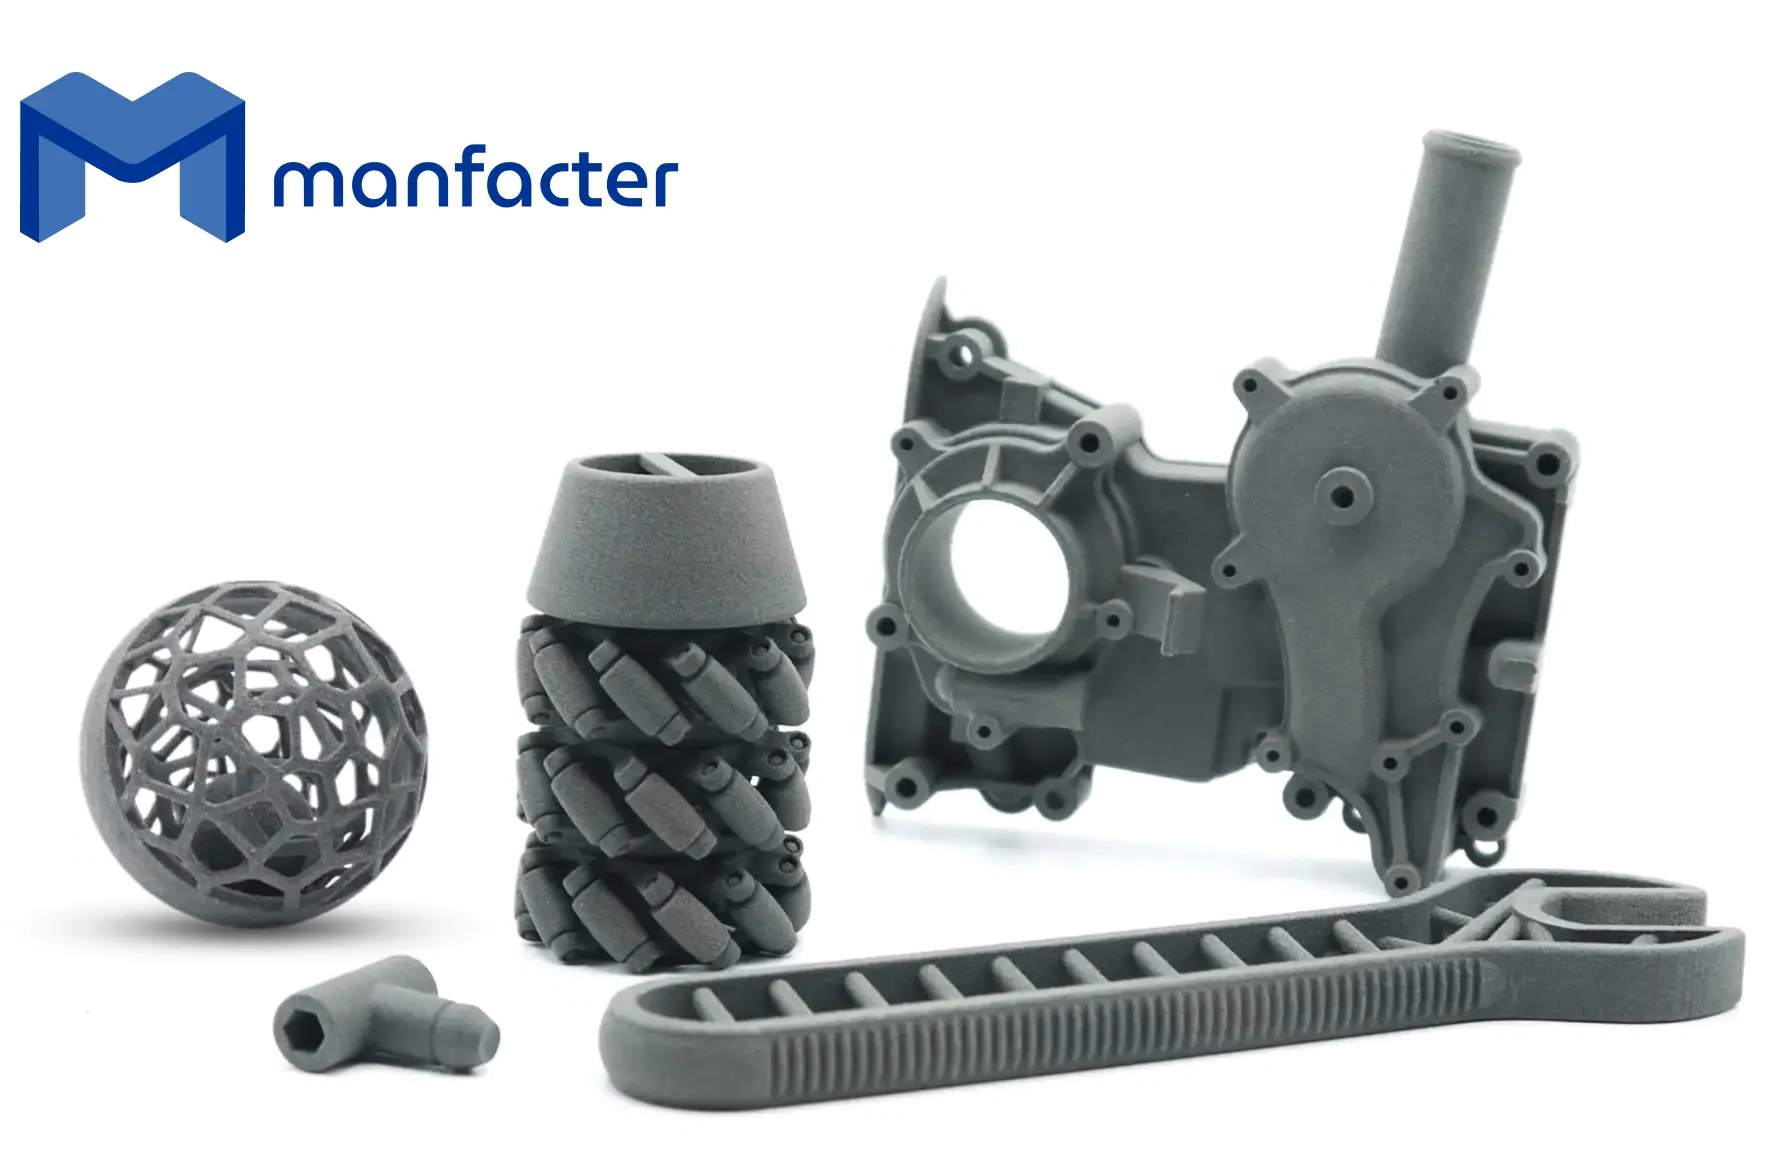
SLS 3D Printing
Selective Laser Sintering (SLS) and Multi Jet Fusion (MJF) use a high-powered laser to fuse polymer powder particles layer by layer until a solid part is formed. The unsintered powder acts as a natural support throughout the process, eliminating the need for additional support structures.
SLS parts deliver excellent mechanical properties, comparable to injection molding. They are strong, durable, and perform reliably in demanding applications.
Advanced Design Tips
-
0.2 mm clearance between living hinges for movement without post-assembly.
-
Assembly consolidation: Reduce bolted components by up to 50%.
-
Diamond lattice structures in walls > 6 mm prevent large-scale warping.
Key Materials
- Nylon PA12: An engineering thermoplastic with excellent mechanical, thermal, and chemical resistance. Ideal for functional parts, housings, gears, and complex geometries without supports. Lightweight, durable, and stable against moisture.

Post-Processing & Optimization
-
Ceramic tumbling: Ra ↓ to 6 µm; suitable for visible parts.
-
Chemical dyeing: UV-stable black/blue finish.
-
Parylene coating: Vapor barrier and food-grade compatibility.
Which 3D printing technology should you use?

If you’re validating a design, FDM or SLA may be sufficient, though SLA comes at a higher cost. For end-use parts, SLS provides superior strength and durability.
Practical Comparison: Cost vs. Performance

The most expensive option isn’t always the best. What matters is choosing a technology aligned with the final application and required post-processing.
A misaligned part, or unnecessary post-processing, means rework, delays, or worse, compromised product performance.
That’s why at manfacter, we help you make the right decision from day one.
If you’re not sure where to start, our specialized manufacturing assistant, ClaudIA, will guide you in selecting the best process and material for your specific case.
Essential Design Rules by Technology

Designing with these limits in mind prevents costly mistakes and ensures parts are right the first time.
Compatibility with Finishes and Post-Processing

The type of post-processing should also influence your choice: not all technologies allow machining or mirror polishing.
How can you avoid mistakes?
We know how complex it can be to choose the right technology to manufacture a part: too many options, too many variables, and very little room for error.
That’s why, with manfacter, you can quickly and clearly compare which process best fits your design, which material withstands the demands of its end use, and how much it will cost.
